Betty has been busy with her Five Dollar Quilt and it's now up on the frame being quilted. It is really amazingly beautiful.
She has captured the essence of the pieces and created a new masterpiece by combining her garage sale blocks and a box of vintage orphan blocks that mom had been collecting. It's a lovely combinations of muted blues and greys with the occasional hit of colour throughout.
To quilt it she is using a combination of cream perle cotton and regular quilting thread so there will be interesting, rustic threads woven throughout...
randomly meandering across the blocks rather than defining shapes and spaces. Luv it....M
Wednesday, February 27, 2013
Monday, February 25, 2013
Breaking the Plane
There's a little more progress on my Pumpkin Patch at Midnight to share with you - not much, but some. With each strip/round it gets richer and richer - I'm just loving it. Since this will be a table topper and not a full-sized quilt it should be done fairly soon.
I've been inspired by Krista Withers spiderweb to break the plane of the border in a few locations to make it just a little bit more interesting. The blocks in the upper left of this photo illustrate where the natural border is - it's a bit tough to see here but the outer border will be a black print (the flecked 'fabric' that you are seeing that looks like a border is the carpet, a.k.a. my design wall!). If I was just making it square I would have stopped after finishing the two triangles in the upper left corner of the very bottom web, but I'm going to have this web (or pumpkin) spill over into the border. I'll do this in two or three other places.
I think I have two more full pumpkins, two halves and a quarter to make and then it will be time to sew all the triangles together and put the black border on it. It's so much fun to look at - your eye spends a lot of time travelling through the various circles, and the pieced corners just seem to pop when the oranges and yellow are added to them.
A few of you were asking which of Material Obsession's books this pattern is from - it's from Material Obsession 2. I'd love to see photos of your projects if you decide to make one.
The instructions advise to pull all your strips for a spiderweb and then sit down to sew, trimming as you go, but I've decided to cut all the lengths that I need before starting the sewing - I just find it easier to have everything organized before I begin to sew. I cut what I need for whatever web I am working on and then mix up the colours a bit with remnants from previous strips to make the pumpkins more interesting....M
Thursday, February 21, 2013
Stripping is Fun!
Thought that might get your attention. Truth is, I have been sneaking away to the basement for these past few days to practice my stripping and I'm getting pretty good at it too, even if I do say so myself. Or maybe I should be saying strip piecing? Either way, it's lots of fun.
It's also a little addictive - you can't wait to see the spiderweb fill in and it's fun to mix in a little surprise colour into different rings to shake things up a bit.
Sewing and trimming, sewing and trimming.
This is the quilt that I'm using for inspiration - totally scrappy. I don't think Sarah used the same fabric twice in the entire quilt.
I'm using a decidedly autumn palette and, while I'm not a huge fan of Hallowe'en, for whatever reason when I look at this pattern I wanted to get the effect of pumpkins at night. So far I think that it's working.
Circles are slowly coming together and it's neat to see the different effect that different light and dark combos create. Right now it's all just being laid out on my designwall floor...
but it's fun none the less. I think I'm going to call it Pumpkin Patch at Midnight....M
It's also a little addictive - you can't wait to see the spiderweb fill in and it's fun to mix in a little surprise colour into different rings to shake things up a bit.
Sewing and trimming, sewing and trimming.
This is the quilt that I'm using for inspiration - totally scrappy. I don't think Sarah used the same fabric twice in the entire quilt.
I'm using a decidedly autumn palette and, while I'm not a huge fan of Hallowe'en, for whatever reason when I look at this pattern I wanted to get the effect of pumpkins at night. So far I think that it's working.
Circles are slowly coming together and it's neat to see the different effect that different light and dark combos create. Right now it's all just being laid out on my design
but it's fun none the less. I think I'm going to call it Pumpkin Patch at Midnight....M
Tuesday, February 19, 2013
Going To The Top of the Pile
I had more assembled than I remembered so before long there was a pile of 28 corners ready to go. Time to cut the muslin foundations and see if I could add a strip or two.
This is going to be fun. I love the assembly process and I think the blocks are going to be just what I had envisioned. The strips and corners are sewn on to half a 10.25" block so I'm working with considerably larger pieces than my 1-inch hexies which should help things move along quite quickly. Well, as quickly as anything moves along for me...M
Labels:
Halloween,
Maple Leaf Rag,
Sarah Fielke,
string quilt
Friday, February 15, 2013
Teenie Tiny Love
Believe it or not, I did do more than take pictures of everyone else's work when we were at the cottage. I always have a hard time trying to figure out what to take with me, so I take too much, and this time was no exception. I thought I was all packed and ready to go and yet minutes before I got into the car I was running around the house like a madwoman tossing even more projects into bags. What's with that??!
I did some cutting for Betty and for Jane and then I took the plunge and started cutting strips for a new project. Yup, I've started making my version of the antique hexie diamond quilt that I showed you a little ways back.
The piece are tiny so I needed to figure out a consistent approach to sewing each block. I started by sewing one edge of each of the hexies that circle the centre hexie so you have a bit of a loose flower and then I sew the seams between each of them. That gets pressed and then it's not pressed again until everyone is attached.
I finished the first block at the cottage and have put 3 more together since then - it's great hand stitching when sitting in front of the TV. They are adorable - I'm totally smittne. This quilt will take me forever but I've decided that I can't focus on that - I love making the blocks so I'm choosing to think of it as one that will get better with age.
I wanted to stay true to the scale of the original so my hexagons are 1 inch finished - if you measure across the hexagon - so I'm cutting 1.5 inch strips and then cutting the hexies from that.
I've realized since drafting my template that hexies are usually measured by the length of the unfinished edge but I didn't know that at the time.
Each diamond has 25 hexagons in it and they measure about 9 inches in length and will be 5 inches across. Now I need to sew 4 diamonds together and then put another colour all the way round the larger diamond. Thank heaven for Jane and her stash - she let me cut several strips to add to my collection.
I still have no idea what this quilt is called so I need to come up with a name for it; any suggestions?
I also tried a new recipe for Caramelized Onion and Goat Cheese Tarts from Sweet Paul. DE-LISH, and oh so easy. The crust is made frozen puff pastry; it seemed a waste not to use it all so I went for a more rustic look and didn't bother to trim the dough to fit the tart forms. They looked great and it's faster that way too.
The only other change I made to the recipe was to add the garlic just for a few minutes rather than carmelizing it for 10 with the onions to avoid it becoming burnt and bitter.
Serve it with a tossed salad and you have an easy, fabulous lunch. Give them a try....M
Thursday, February 14, 2013
Labours of Love
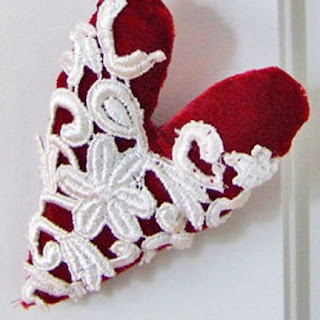
Given that today is Cupid's day it got me to thinking about a couple of lovely hearts that I have received as gifts from equally lovely sisters, Jane and Linda. They aren't quilts but they are handmade with lots of care and hold a special place in my heart.
This one is made from velvet with a lace appliqué and Jane gave it to me several years ago. She is a romantic and makes lots of handmade Valentine's cards every year.
It's about 4 inches tall and velvet front and back - I love the contrast of the thick lace against the plush velvet. I like it so much that I keep it out all year round; it hangs on our closet door and is a constant reminder of her talents and friendship.
And last winter when I wasn't feeling that great Linda made me this beauty. It's at least twice as large as Jane's and there is so much work in it I don't know where to begin.
There are flower ribbons, vintage buttons, velvet leaves, beadwork; it goes on and on.
One thing you don't see is the beaded gold tassel that hangs from the tip (I couldn't fit it in to the frame and still show you all the work in the heart itself). I can't imagine how long it took her to make. It too stays out all year, and since it is Valentine's Day I thought I would make them my Valentine to you. Hopefully your day is filled with sweet surprises...M
Labels:
creative family & friends
Monday, February 11, 2013
Everything Old Is New Again
Amid all the cutting and sewing and digging through stashes while we were at the cottage there was also a bit of gifting going on. Jane had picked up this vintage Double Wedding Ring in a garage sale and decided that it would be quilted faster if she gave it to Betty. Needless to say, there were one or two squeals of delight with her decision.
It's in great shape and has a wonderful selection of fabrics in it. We were having a bit of a time deciding if the cream fabric is linen or cotton but think that it's cotton.
Now Betty's dreams are filled with how to quilt it - it sounds like it is going to become a duvet cover.
As a quid pro quo, Betty gave Jane a beautiful vintage floss holder with remnants of silk floss.
We found this in mom's treasures when we cleaned out her house; it's made from a tea towel and a piece of cotton sewn into channels to store skeins of floss without getting them all tangled together.
It looks like there was a bit of tangling anyway but it makes for a beautiful piece of art, which Jane is planning to frame.
Brilliant! It will be gorgeous....M
Labels:
creative family & friends,
vintage quilts
Friday, February 08, 2013
Jane On a Roll
Jane is a quilt commando at the best of times, and our weekend at the cottage was no exception. We spent a lot of time rummaging through her stash and when we came across fabric that she had been looking for to bind a Christmas quilt that she had made several years ago (7, I think) she pulled both it and the quilt out to finish it off. She made the binding and has started sewing it on. It wasn't finished when we left the cottage but it will be soon. I'll have to get a pic of the entire quilt for you.
It is a beautiful Log Cabin in rich deep greens, reds and golds. The blocks are placed on the point and the border triangles are alternating velvet solids in deep burgundy and green; it is backed (and will be bound) with a beautiful huge hydrangea print. She was quite excited with the progress on it and is anxious to get it finished and into the quilt closet to use.
She also pulled another pretty one that she and Linda are making for a friend and selected more fabrics to add on to the centre panel that she has sewn. It's done in delicate floral prints and looks like a Snowball but the corner blocks have been appliquéd on instead of stitched in.
The 9-Patch blocks that you see in the bottom right corner will be used in one of several borders.
She also wanted to incorporate some Flying Geese so I gave her a quick tutorial on making 4 at one time and she was off to the races.
In no time at all she had about 50 made.
I can't help but wonder if this is the secret to her success...
And just because you can never be working on too many quilts at one time, she pulled out the pieces for her Fruit Salad and sewed several rows together.
This is the same pattern that Betty started working on last summer. They are using fabulous, rich colours and I have no doubt that they will be amazing....M
Labels:
creative family & friends,
Fruit Salad,
Log Cabin,
Snowball
Tuesday, February 05, 2013
A Little Fabric Therapy
Jane recently had her cottage winterized so she and Betty and I decided it was time for a weekend getaway to do nothing but play with fabric. What a great idea! It's always so interesting to see what everyone is working on and to share fabrics and techniques, lots of great laughs and maybe a glass of wine, or two, and it was really neat to be at the cottage in the winter.
Saturday was so snowy that often we could not see the ice fishing huts that were lined up out on the lake, but it made for a spectacular walk on Sunday morning.
Around this time of year I start getting weary of winter with its cold and snow, but this was magical. Made you happy to be Canadian.
Betty has been working on her Five Dollar Quilt using the blocks she bought at the garage sale this summer and a box of vintage blocks that she inherited from mom. It is going to be a work of art. Surprise, surprise.
Not all of the blocks are the same size so she is adding borders to make everything fit and is doing an amazing job of it. She brought the blocks to show us what she has been doing but spent her time making Christmas stockings and got a good jump on them.
She's been busy cross stitching names and now has the makings for several cut and ready to assemble thanks to Jane giving her the keys to her Christmas fabric stash and letting her go to town.
She also cut lots of different bias bindings for them and tried using the Clover bias tape maker that I got last year to so see if it would go faster.
It worked perfectly.
She only ironed one side down, which is what she needed, and not only sped through the process but avoided singeing her fingers at the same time. Bonus!
Next time I'll show you what Jane got up to...M
Subscribe to:
Posts (Atom)